- Jeffchen2121@gmail.com
- +86-18688742252
- Language
-
 Español
 -
 Português
 -
 Portugiesisch
 -
 Français
 -
 日本語
日本語 -
 Български
 -
 한국어
한국어 -
 Türkçe
 -
 Nederlands
 -
 English
 -
 Eesti
Eesti -
 Suomi
Suomi -
 বাঙ্গালি
 -
 беларуская
 -
 Ελληνικά
 -
 Kreyòl ayisyen
 -
 עִברִית
 -
 हिन्दी
 -
 Magyar
 -
 íslenskur
 -
 Gaeilge
 -
 italiano
 -
 Hrvatski
 -
 Latinus
 -
 latviski
 -
 Melayu
 -
 Malti
Malti -
 Монгол
 -
 မြန်မာ
 -
 فارسی
فارسی -
 Polski
 -
 عربي
عربي -
 Română
 -
 русский
 -
 slovenský
 -
 Slovenščina
 -
 Afrikaans
 -
 svenska
 -
 dansk
dansk -
 український
 -
 o'zbek
 -
 Cymraeg
 -
Zulu
-
 Tiếng Việt
 -
 bosanski
 -
 Deutsch
 -
 eesti keel
 -
 ไทย
ไทย
-

How to fold bespoke gift boxes? Now introduce the method and steps of folding hexagonal bespoke gift boxes
Mon May 02 18:28:03 CST 2022
1. Make your favorite bespoke gift boxes by yourself:
There are various types of bespoke gift boxes, and the choice of bespoke gift boxes is also different according to different people. It is indeed very labor-intensive to choose your favorite folding gift box among the many bespoke gift boxes, and you may not be able to choose the one you like. It's better for a novice to make a favorite bespoke gift boxes. Next, I will show you how to fold hexagonal bespoke gift boxes. Put your favorite gift in it!

2. Steps to fold hexagonal bespoke gift boxes:
How to fold hexagonal bespoke gift boxes, the preparation of materials is very important, let's take a look at what materials to prepare. Two pieces of cardboard, one wider and one narrower, the narrower one is slightly longer than the wider one. Hard cardboard can be purchased at the flower shop outside, or you can choose colored paper bags as raw materials. There is no need for any tape or adhesive. Of course, if you are afraid that it will not be fixed well, you can also prepare it in advance.

2.1. Take out the wide cardboard and leave a narrow fold, and then fold the part other than the fold into six equal parts, so that you can continue to the next step.
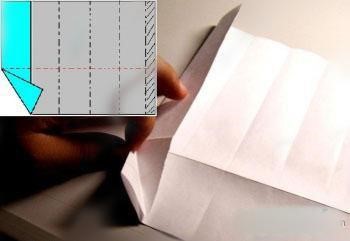
2.2. As shown in the picture, fold the red line shown in the picture on the paper (the specific operation of this step can be done in the next tutorial, don't worry).
2.3. All the grids are folded as shown in Figure 3.

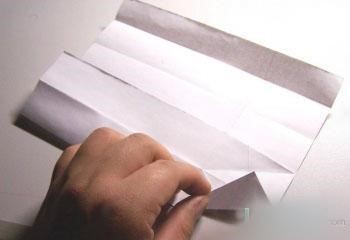
2.4, as in Figure 4. It is worth noting that the crease must be compacted. You must know that in the steps of how to fold the bespoke gift boxes, this crease plays an important role in indicating. If the crease is not exposed, it will be difficult to carry out Next step.

2.5. Next, we can see the part of the paper without creases, all we need to do is to fold this part upwards.

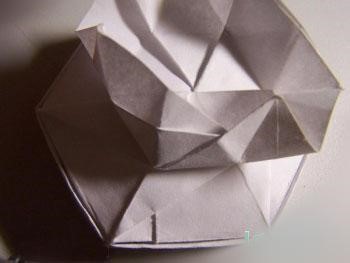
2.6. Roll the paper into a hexagonal prism. Fold the creased part of the paper inward, and insert the folded edge left in step 1 to the other side.

2.7. What we do now is to make the crease part according to the crease. We can turn one side first, and then press down the middle one on the other side.

2.8. Next, perform the flattening step, which is critical for how to fold the bespoke gift boxes.

2.9. After the above eight steps, the bespoke gift boxes are completed.

2.10. Take out the narrow piece of paper left at the beginning to fold the lid. Do the same as steps 1, 2, 3, and 4.

2.11. Then, the part with creases cannot be folded, as long as the part without creases is folded.

2.12. Rotating and pressing down

2.13. After rotating and pressing down, it can be made as shown in Figure 14. Of course, this is not the last step, and a cover can only be made after subsequent work.

2.14. Fold each side of the hexagon to the center line
2.15. After step 14, it is necessary to interlace the adjacent two sides and three knife edges with each other.

2.16. At this point, basically how to fold the bespoke gift boxes is done, and finally combine the cover with the bottom of the box, this is a complete bespoke gift boxes.

Although the above steps are a bit cumbersome, the folding effect is really good! Interested friends can try it, and if there is something you don't understand, please ask again.